0 x item(s)
- 0600 Slaters Plastikard Plastic Rodding
- 0446 Slaters Plastikard Chequer Plate
- TT3040M Hornby 0-6-0T Terrier Steam Loco 32655 BR Black
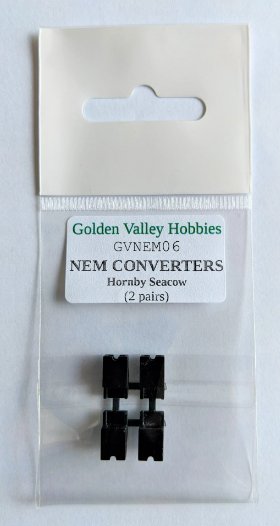
GVNEM06 Golden Valley Hobbies Conversion NEM Pockets
These converters are designed to replace the coupling on the Hornby Seacow wagon.
For this wagon modification, you will need a sharp craft knife/cutters, needle files, superglue and a screwdriver.
Begin by cutting the arm at the crease on the underside, as the arm angles downwards. Take care to make a clean cut.
Next, tidy up the end of the arm and ensure it fits snugly on the channel of the NEM converter. The fit should be reasonably tight. Once you are satisfied with the fit, remove the arm and apply a very small amount of superglue to the pocket. Make sure the arm is level and firmly pushed into the channel of the pocket.
Allow the glue to dry completely. Afterward, file just behind the pocket where the arm has been attached, as shown in the photo. This step ensures a smooth surface and proper fit for a coupling tension lock or Kadee coupler (the short Kadee 17 is the best fit).
-

Academy Models
-

Accurascale
-

AFV Club
-

AIP by Bachmann
-

Airfix
-

Arnold
-

ATD Models
-

Auhagen
-

Bachmann
-

Bachmann Narrow Gauge
-

Bachmann USA
-
Barrie Stevenson
-

Bassett-Lowke
-

Berko
-

Busch
-

Cambrian
-

Clark Railworks
-

Corgi
-

Cornerstone
-

Dapol
-

DCC Concepts
-

Deluxe Materials
-

Dundas
-

Easy Model
-

Eckon
-

EFE Rail
-

EFE Road
-

Emhar
-

ESU
-

Exclusive First Editions
-

Faller
-

Fleischmann
-
Gaugemaster
-

Gecko Models
-

Golden Valley Hobbies
-

Graham Farish
-

Greenlight Collectibles
-

Heljan
-

HK Models
-

Hornby
-

Hornby International
-

Hornby TT:120
-

Humbrol
-

I Love Kit
-

Jouef
-

K&S Metals
-

Kadee
-

Kato
-
Kernow Models
-
Kestrel
-

Kibri
-

Lenz Digital
-
LightCraft
-

Liliput
-

Lionheart Trains
-

Merit
-

Metcalfe
-

Middleton Press
-

Mirror Models
-
Miscellaneous
-

model scene
-

ModelMaker
-

Murphy Models
-

Noch
-

Oxford Diecast
-

Oxford Rail
-

Parkside by Peco
-

PECO
-

Plastruct
-

Platform 5
-

PM Model
-

Preiser
-

Proses
-
RailMatch
-

Rapido
-
Ratio
-

Revell
-

Revolution Trains
-

Rivarossi
-

Roco
-

Roden
-

Scale Model Scenery
-

Scalextric
-
Shawplan
-

Slaters
-
Smiths
-

Springside
-
Star Tec
-
Strathwood
-

Superquick
-

Takom
-
Taliesin
-

Tillig
-
Tiny Signs
-

Toyway
-
Tracksetta
-

Train-Tech
-

TrainSave
-

Trumpeter
-

Viessmann
-

Vollmer
-

Wills
-

Woodland Scenics
-

Xuron

Connect with us socially

